You know, sometimes you just see something and you know you need it .. even if you really don’t! .. (No? Just me then? ..) Like this coal bucket for example. I mean, we don’t even NEED coal. Heck, we don’t even have a real fire in our fireplace! But I really liked this when I saw it. I mean .. rusty, old and in desperate need of a maker-over. What’s not to like? Because sometimes you’ve just got to look past what the item is now .. and think of what I could be 🙂

One thing was clear from the start though – this was NEVER going to stay brass. I mean, all that polishing! Life’s too short people! But like I’ve said in previous posts, .. chalk paint is your friend!
Honestly, there is not a lot that chalk paint doesn’t cover. Or chalk spray paint for that matter – check out this owl ornament makeover. Or this budget Nativity play which had a COMPLETE transformation!
Get ready to paint
For those of you who are new here, when it comes to painting .. clean, clean and clean before getting out the paint brush! This bucket had a good wipe down with sugar soap and was left to dry after a further wipe down with some soapy water.
The actual painting didn’t actually take very long at all. What took the REAL time was clearing up the mess when I walked paint all through our kitchen. Don’t ask – even I don’t know how I did it (especially as I was sitting down for most of the project!!).
I covered the whole thing in 3 layers of white chalk paint (Rustoleum), leaving it to dry in between layers. I painted the rim of the inside of the bucket just in case you would see but I didn’t bother with painting the whole of the inside. Again, life’s too short – when was the last time someone inspected the inside of your plant pots when they came round? .. Exactly!


The finishing touch
I’m lucky to have a Silhouette Cameo cutting machine which helps to create stencils and vinyl designs. (Yes, my hubby did good when he got me this for my birthday!! .. I’ve decided to keep him.. ).
I’ve used it for so many things, including cutting out vinyls to organise my bathroom cabinet and airing cupboard. I absolutely love it. But of course you can do a similar project without the Silhouette so stick with me!
I created a stencil which I cut out on the Silhouette. The design was transferred onto the bucket with transfer paper. As it had to curve round, I cut into the stencil in various areas (see picture) to make sure I could “wrap it around”.
To stick it down, you work it from the centre going outwards, smoothing it down to make sure there are no bubbles. It’s a bit fiddly, but well worth the effort to get it on there smooth.
Once you are happy with the position of the stencil, used a sponge brush (these are awesome for stencilling!!) to apply the paint. I opted for a grey acrylic paint. It’s just a bit of a softer look than black paint, especially when there’s such a strong contract to the white paint.


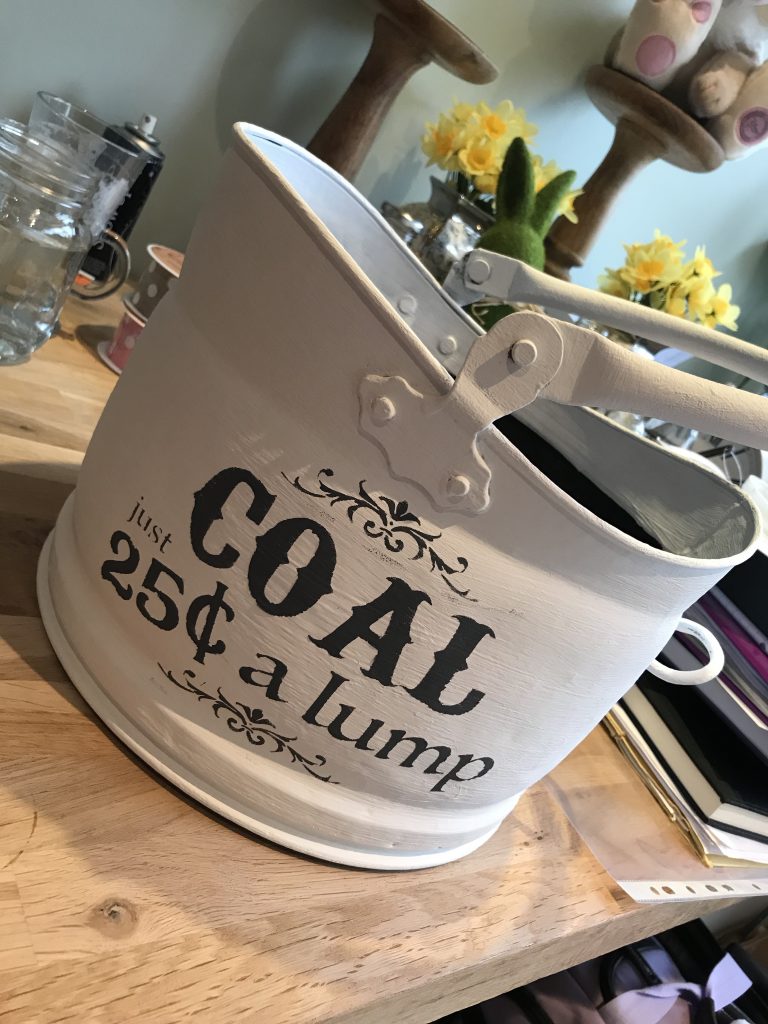
It looks worse during the whole stencilling process .. let’s face it, it’s not the best look, but removing the stencil and seeing your project take shape is just the best feeling!
Want to do a similar project, but don’t have a Silhouette machine? Don’t worry! – check out Etsy for custom vinyl designs that you can apply to your project. Custom vinyl decals can create a similar look without the need for a stencil or any painting 🙂
A brand new coal bucket!
And that’s it – our new coal scuttle planter. We have a LOT of plants in our home and this is by far my favourite plant pot now. There are not a lot of huge planters that you can buy for £10. And especially one that is custom made to your taste!
Sharing is caring – Please Pin for later !

Let me know what you think of it? Would you have used the coal bucket for anything else? I’d love to hear or see your ideas!
Some of the links in this post are affiliate links, which means I earn a small commission if you decide to use my links to purchase something (at absolutely no extra cost to you – how cool is that?!). This will allow me to continue to share great ideas and projects with you, so I am very grateful for your support!
Make sure to check out some of these
makeover projects too!


Follow me on Social Media!
Leave a Reply