I’ve been having so much fun doing some Halloween projects this year! I’m not normally one for a Halloween decor. Unlike Christmas the decorations are only up for such a short period of time. And I don’t want to spend a LOAD of money for just the one day. And that’s the beauty of this project! You won’t believe how easy it is to create an eye catching Halloween spell book. Which in a previous life was a £1.50 bargain from our local charity shop!
Let me talk you through how you can EASILY transform an old book and do this yourself. Or, if you don’t like using old books, use a blank book where you can keep your recipes!
Just to warn you, there’s a LOT of photos in this blog post 😉
what i used to make my Halloween spell book
An (old) book with a hard cover
Tissue paper – I bought black, but you can paint it so whatever colour is available!
Mod Podge
Black acrylic paint
A printer (optional)
Hot glue
Some small Halloween decorations to stick down (optional) – the Range did a “Creepy Crawlies Pack”, but check out your local (craft) shops for spiders, bugs, bats or mini skeletons.
Gilding wax, similar to this one on Amazon.
A small brush
Some black tea (I’ll explain later!)
I know this may sound like a long list, but you’ll have most of this in your craft stash, or it’s fairly cheap to buy!
here’s how to transform your books
Take the paper cover of the hardback cover. Cut a piece of the tissue paper to size, large enough to leave some excess to be able to wrap around the edge of the entire book cover.
Cover the front of the cover with mod podge. Crumble the tissue paper into a ball and unfold it. You’re going to want to make creases in the paper – the more creases, the more the book will look old and worn.


Place the tissue paper on top and press down. On this occasion we’re NOT looking to get any of the creases out. Which is the complete opposite of what we’re normally trying to achieve when we’re doing a Mod Podge project!

Cover the side of the cover and press down, and complete the process until the whole of the book is covered in tissue paper.

Open up the book and fold he excess around the edges. For the actual binder bit in the middle, I made two diagonal cuts and cut off the excess paper, level with the binder.

Add some mod podge on the inner edges of the book cover and fold over the tissue paper until it sticks to the inside. Follow this process until all the edges of the book have been covered. Cover the whole of the tissue area with one further layer of mod podge. Leave to dry completely.


adding some spooky wording
I used my printer to create the wording of the books, (in this case “Spells” and “Potions”).
Cut the paper to size and Mod Podge in place. Add a layer of Mod Podge over the top and leave to completely dry.
If you don’t have a printer you can do this bit free hand too! Just write the wording on the book with a pencil.


Take your glue gun and trace the wording on the paper. I also went around the paper to create a rectangle “label” around the wording. Finally, I used my hot glue gun to create some “nails” around the edge of the book. At this stage they are just small round “blobs” of glue!

All that’s left now is to hot glue all the creepy crawlies onto the book. At this stage you’ll be wondering what the heck it’s going to turn out like? AMIRIGHT? Trust me, it’s going to be amazing!

Tip: – If any of your creepies are hollow, fill the hollow with hot glue to make it level. Then leave to set and use some more hot glue to attach to the book.
Leave all glue to completely dry and then paint everything with a layer or two of black acrylic paint until it’s completely black.
This was my book after 1 coat of paint.

Creating the magic!
This final step is where the magic happens! With some gilding wax on your finger, carefully rub some of the gold onto the hot glue wording, rectangle and the “nails”. Follow the same process for the creepies on the book. I LOVE this part of creating the book – it just makes it come to life!

Once you are happy with this, take a small brush and add a very small amount of gilding wax. Take a piece of kitchen roll and dab off the excess of the wax. Using a dry brushing technique carefully brush the cover of your Halloween spell book!
This is where those creases will catch the gold and will stand out. Giving it that “old” and worn feel.

AGING THE PAGES
I absolutely loved the end result, but wasn’t too pleased with the pages. They were far too white and pristine!

I made some black tea and with a brush (with barely any tea on it), I brushed the outside of the pages. This gave them the aged look I was after.

Doesn’t that look MUCH better?
adding my Halloween spell book to a spooky display
What a transformation! It’s such a fun item to create as part of your Halloween display!


I’m creating a little Halloween corner in our kitchen. And I actually made two books – here’s the other one!

Here’s a closer look at those creepy crawlies

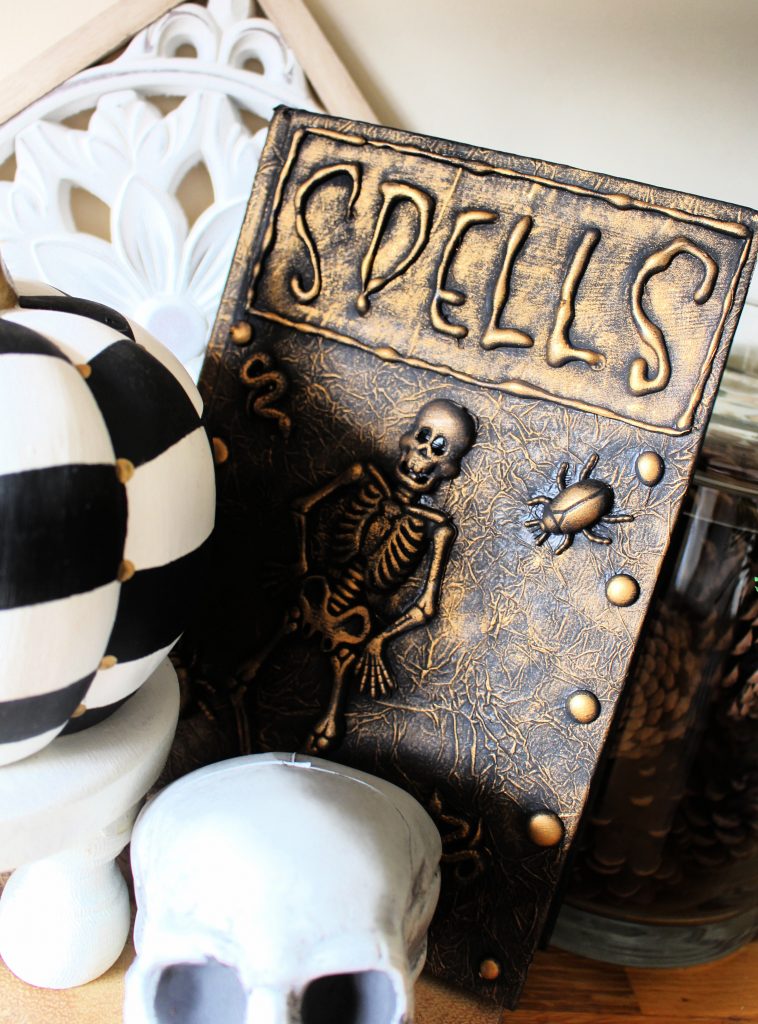
Do you see what I see on the right of the picture below?? YES, I did take down my kitchen Christmas tree to create a Halloween tree! Stay tuned peeps!!

Opinions in our house are equally divided! Which book is your favorite?
Would you Pin me please?

Need some more spooky inspiration??
I think you’ll love these projects!


Some of the links in this post may be affiliate links, which means I earn a small commission if you decide to use my link to purchase something (at no extra cost to you!). This will allow me to continue to share great ideas and projects with you guys, so I would be grateful if you did!
Follow me on Social Media!


Leave a Reply