I set myself a little challenge for this project! To grab some left over supplies and create THE cutest Valentine display on a budget! And because I used left over bits and pieces, I only spent £1 for the polystyrene hearts. Oh, and I bought the glitter which had 10 tubes for £1 in a local craft shop, so technically speaking I spent 10p on the red glitter. Everything else I still had in my craft stash. And I’m SO excited to show you how it turned out! ‘Cause I think you’re gonna LOVE it!
And of course you don’t have to do this for Valentine – you can use the very same idea for Easter / Spring and just change up the decorations (I’m thinking bunnies and carrots!!) Check out what you’ve got lurking in your craft stash and craft with me. Let’s do it!
What I used for this Valentine display
A left over Coffee Mate Canister
One sheet of white A4 copy paper
Some left over burlap material
Some left over Hessian roll
A few wooden Scrabble craft tiles
Raffia
Floral foam (oasis)
Some plain white paper straws
A pack of polystyrene hearts from The Range for £1!
Red acrylic paint
Red glitter
Mod Podge
Hot glue
Red and White Baker’s twine
Putting together your display
I tried to take off the Coffee Mate label, but boy that sucker was STUCK on!! So, I decided to cover it with a sheet of white A4 copy paper. I figured it was much faster than painting it white and SO much less messy.


Next I took some left over burlap material. I didn’t have enough to cover the whole cannister so decided to cut it in half length ways and hot glue it straight onto the tin.
To fill up the gap in the middle I used some left over some Hessian roll, cut it to size and hot glued it in the middle.


So that’s your base done! Well, pretty much .. we’re going to prettify it later on!
Adding some LOVE to your Valentine Display!
Of course you can’t have Valentine without adding a few hearts here and there 😉
I bought this pack of 6 from The Range which were just ideal for what I had in mind. I took off the little hooks and string and painted them on both sides with a red acrylic paint. Leave to dry.

Wait for the paint to completely dry and grab your Mod Podge. Now, if I’d had more glitter, I would have covered both the front and the back. However, I worked with what I had and made it work by only covering the front of the heart with Mod Podge and sprinkling the glitter straight on. Leave to dry and admire the sparkle!


Next I dug a small hole at the base of the heart, dropped in a small bit of hot glue and pushed the straw into place. Hold it until it sets. Unfortunately I forgot to take a photo of this bit, but I hope it speaks for itself! Follow this process for all 6 hearts.

As you can see in the background, I experimented by wrapping one of the straws in baker’s twine to add some more colour. In the end, I decided to only do this for one of the straws!
Of course, this step is completely optional, but if you do decide to do it, secure the twine in place by adding a small amount of hot glue here and there whilst wrapping the straw.

Putting your Valentine display together
This is where the fun bit starts; Putting your whole Valentine display together.
Now, I’ll be honest, .. I got a bit carried away at this stage as I was taking some videos for Instagram and COMPLETELY forgot to take photos as well. But, let me talk you through it!
- Fill up your cannister with the floral foam, leaving a bit of room at the top.
- Fill in the top part with some raffia. Now, this is messy stuff and chances are, you will want to cut some of this to shape.
- Take your “heart straws” and start pushing in the straws into the floral foam, creating some height at the back, cutting the straws smaller as you move to the middle and then the front of your Valentine display.
That’s pretty much it!
I felt the hearts needed a little bit EXTRA and so I created some small raffia bows that were hot glued on the top.

I also created a messy raffia bow, tying it together with some baker’s twine. This is going to be hot glued on the front, but not before adding a bit more detail to the tin!

finishing touches
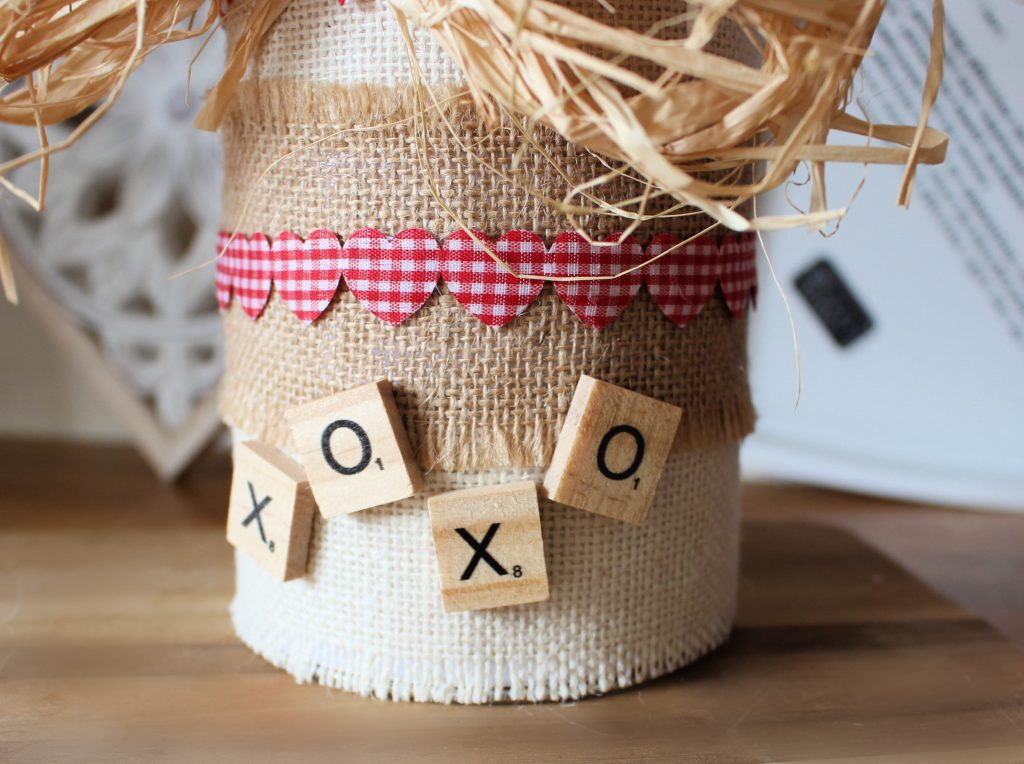
For the final finishing touches I hot glued some heart ribbon around the base, adding some more colour. Finally, I wrapped some baker’s twine along the top of the tin (you can’t really see it, but I know it’s there!) and hot glued the above raffia bow straight onto this at the front.
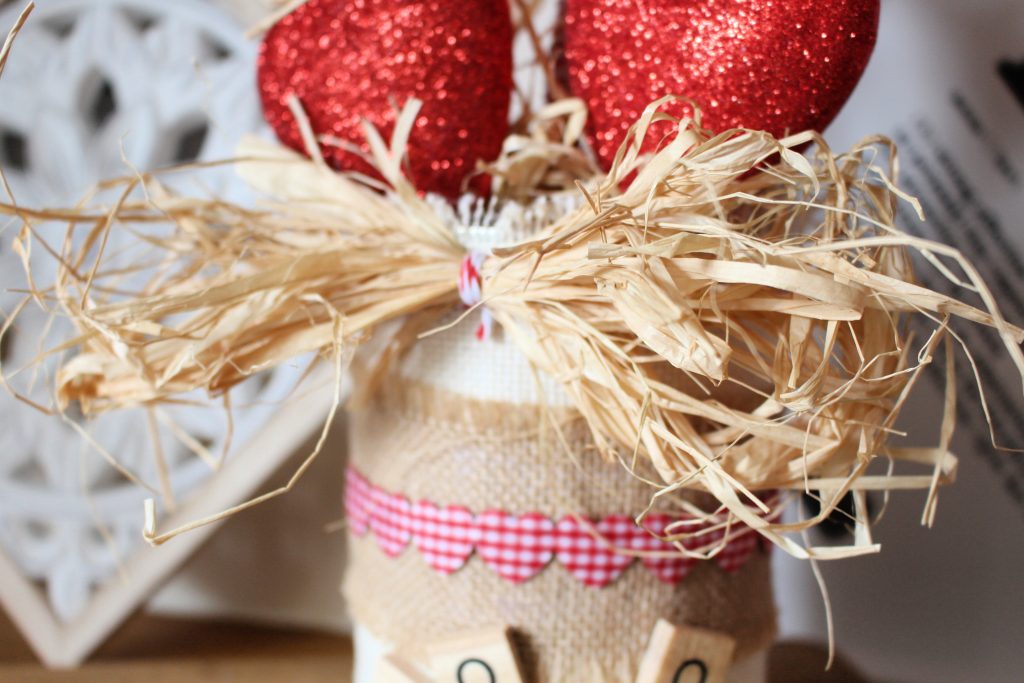
Grab some wooden tiles to make some wording of your choice. I opted for a very simple XOXO to finish if off completely. Let’s face it, the “X” is usually the one left over so it seemed like a perfect opportunity to get rid of 2 of them! 😉
And there it is!! A £1.10 budget Valentine display which looks adorable in our kitchen.

And I love it even more because I hardly spent any money on it!
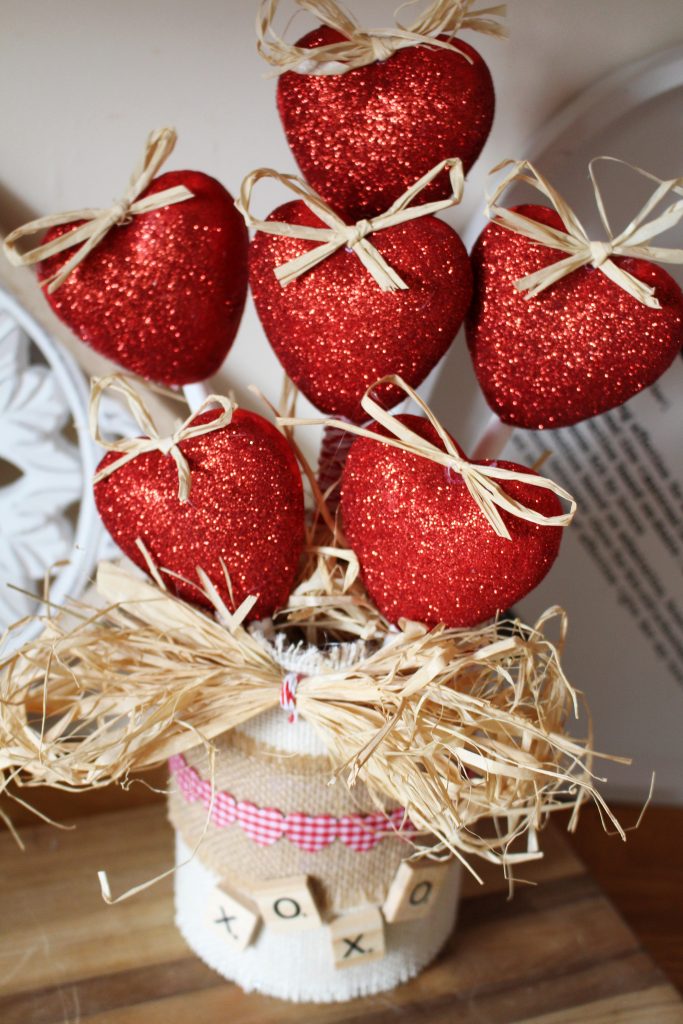
Unfortunately the photos don’t do it justice, but the glitter is lovely and sparkly every time the light catches it!

Don’t forget to Pin me!

Some of the links in this post may be affiliate links, which means I earn a small commission if you decide to use my link to purchase something, at no extra cost to you! This will allow me to continue to share great ideas and projects with you guys, so I would be grateful if you did ?
Have you checked these projects out yet?


Follow me on Social Media!


Leave a Reply